
A Complete Guide to Heat Tape Installation
Aug 12, 2026

Choosing the right heat tape system is only half the battle, proper installation is what guarantees performance. When installed correctly, high-quality heat tape and cables deliver reliable freeze protection and a lifespan of 20+ years.
This guide breaks down everything you need to know, from understanding industry terminology, choosing the right cable type, determining the key problem areas and designing your system around them, power requirements for your system, prepping the installation, installing the system, controlling the system, and maintaining the system.
What is heat tape, heat cable, or heat trace?
While it's commonly referred to as heat tape, the snow melting industry tends to use the terms "heat cable" or "heat trace" interchangeably with heat tape. These are all the same. Regardless of the name, these systems all serve the same purpose in creating open, clear channels through the snow and ice so meltwater can flow off the roof and down the downspouts without freezing into dangerous ice dams.
Choosing the right cable: Self-Regulating vs. Constant Wattage
If you’ve spent five minutes searching for heat tape online, you’ve probably noticed two main varieties popping up: Constant Wattage and Self-Regulating. They might look similar on the outside, but under the hood, they operate completely differently and picking the wrong one can lead to sky-high electric bills or a system that doesn't last more than 1 or 2 seasons. Not all brands of heat cables perform the same way in freezing environments. Understanding the difference between the two main categories is essential before purchase and installation. The last thing you want is for your system to fail mid winter and be stuck with an ice dam causing leaking into your home. Self-Regulating heat tape is recommend 99% of the time over cheap constant wattage heat tape.

Left: Constant Wattage
Right: Self-Regulating

Self-Regulating heat tape will cost you more up front, but will save you constant replacement or maintenance costs over the next 20-30 years. Constant Wattage heat tape has to be installed with an abundance of care and caution over self-regulating heat tape to prevent fire hazards. If you regularly see snow in the winter, don't prioritize saving a couple bucks over preventing roof and ice on your roof.
Be wary of self-proclaimed "high-quality" or "self-regulating" heat tape systems sold online that lack recognizable brand information, downloadable product manuals, or clear technical specifications.
On platforms like Amazon, direct-from-factory import brands often cut corners to undercut prices. These cables frequently use cheap plasticizers in their outer jackets that degrade rapidly under winter UV exposure, leading to cracked insulation, short circuits, or even fire hazards. More importantly, many of these unbranded products lack authentic UL or CSA safety certifications. A non-certified heat cable hasn't undergone rigorous testing for cold-bend flexibility or thermal aging. When you're installing a heating element onto a wood structure or near flammable roofing materials, buying unverified equipment to save $50 isn't worth risking thousands of dollars in property damage. A good, reliable product will have easily acceptable installation manuals, clear technical specifications, and a clear process to resolve problems if they arise.
Guards
Bars
Planning + Measuring (The 20-year Foundation)
Before buying a single foot of heat cable, you need an exact game plan. Under-sizing a system leads to ice buildup at critical junctions, while over-sizing can overload your electrical circuits or waste money on unused cable.
Proper planning starts by pinpointing where the ice is forming, measuring those specific zones, and verifying your electrical supply can safely handle the load.
Phase 1: Identify Your Ice Problem Areas
Not all winter ice issues are created equal. Installing heat cable across your entire roof edge when the problem is localized wastes time and energy. Walk your property late in the winter or review photos from past winters to identify which category you fall into. Not sure where your problem area might be?
Target These Icy Areas With Heat Tape.
The Main 2 Problems.
Problem A: Roof Eaves, Valleys, and Gutters (Full Protection Needed)
Symptoms:
Thick ice ridges forming along the shingle edge, icicles hanging from the roof line, or water backing up under shingles into the home.
Cause:
Heat escaping from the attic melts snow on the upper roof, which refreezes as soon as it reaches the cold, unheated overhang.
Solution:
A complete serpentine pattern on the lower roof edge, traced through the gutters and down into the downspouts.
Problem B: Gutter & Downspout Freeze-Up Only
Symptoms:
Ice dams are not forming on the roof overhang, but gutters overflow with solid ice, sag, or downspouts freeze solid, burst, or warp.
Cause:
Good attic insulation and ventilation prevents roof snowmelt, but slow daytime thawing or fluctuating temps cause standing water in gutters to freeze overnight.
Solution (Gutter-Only Tracing):
You do not need the full zig-zag pattern on the shingles. Run a straight line of heavy-duty, self-regulating cable directly along the bottom of the gutter trough and drop it down the downspout to keep drainage channels clear.
A home or building with good attic insulation and ventilation may still need heat tape installed along the overhangs, valleys, and additional areas if it's located in a snowier climate or region. Areas with low snowfall are the most common for a gutter only installation.
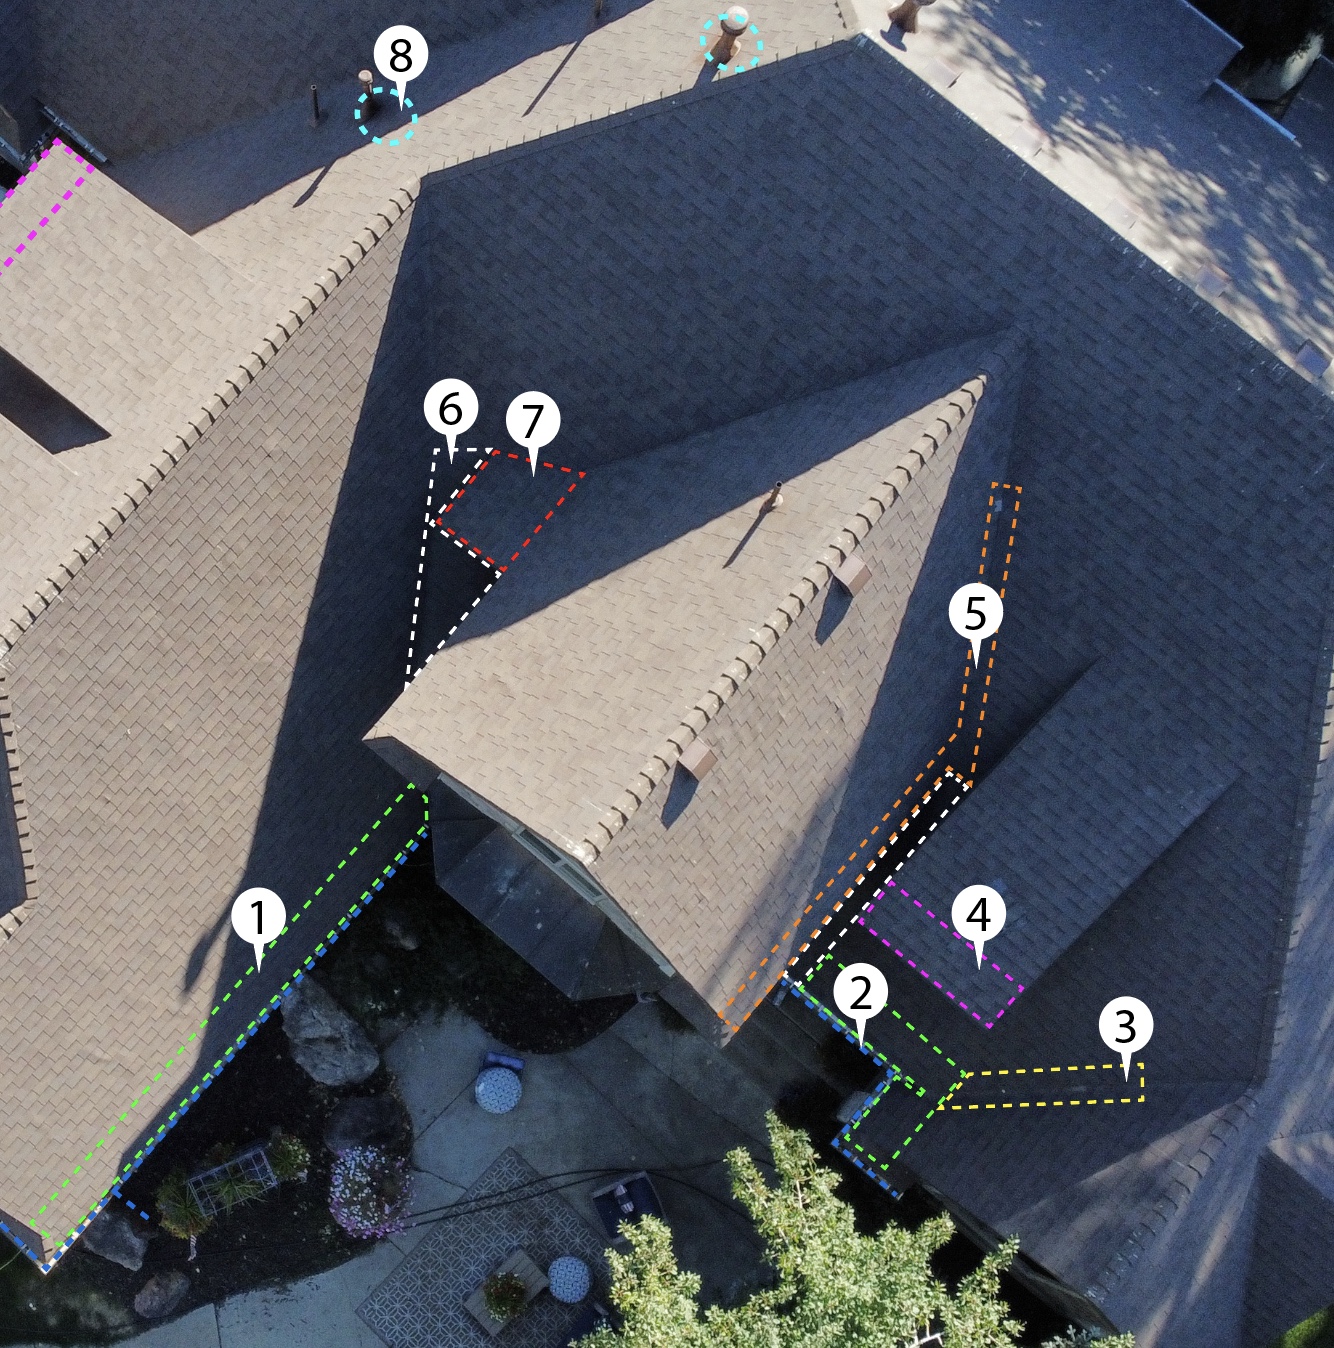


The best way to measure a heat tape system is to use a heat tape calculator. You'll need to measure the length of the eave/ gutters, depth of the eave, number of valleys, downspout lengths, and any extra amount of heat tape you'll need for your system. Make sure to include cable to reach your power source, or to double anything the system may have (i.e. needing to double back the heat tape in a downspout or gutter to reach another part of the roof).
When planning a home, or adding power, the best locations for outlets are in the eaves near downspout locations. In most cases this will eliminate the need to double back heat tape to other locations on the roof, allowing the system to end at the end of the downspout.
Heat Tape Power Requirements
A long heat tape run draws significant power, especially during cold startup (inrush current). Skimping on electrical planning will lead to tripped breakers in the middle of a blizzard. Calculate the maximum potential amperage draw of your planned heat tape system. Multiply the linear footage and the maximum potential draw (watts/ft) then divide that total by the heat tape voltage to determine the maximum potential draw. Because self-regulating heat tape will adjust its output, a 6w/ft heat tape system actually has a maximum output of 9.6w/ft. Your system should not exceed 80% of the available power on the circuit. Verify your specific heat tape system's maximum draw with the product manual.
A 120v, 6w/ft self-regulating heat tape system has a maximum of 150' on a 15AMP breaker.
System Maximum Draw:
(150ft x9.6w/ft)/120v = 12AMPs
80% maximum circuit rule:
12AMPs/ 15AMP circuit = 80%
Most 120V heat tape systems have a maximum single run length (typically 150 to 200 feet) (15Amp/20Amp breaker). For longer continuous runs, split the system across multiple circuits or switch to a 240V system. It is important to note that the temperature your heat tape systems starts at may influence your maximum system length. A cold start up will in-rush or spike power demand, potential tripping the breaker as demand suddenly exceeds power available. Cold start ups can usually be resolved by turning on/off a few times the system until the system no longer requires as much power. While most systems are designed with a minimum start up temp of Here is a quick chart for Heat Tape Pro. View full product specifications/manuals here.

Mandatory Equipment Protection:
National Electrical Code (NEC) requires ground-fault equipment protection (30mA trip level) for all outdoor heat trace systems. Standard 5mA home outlet GFCIs may experience nuisance tripping due to normal cable capacitance. It is a common by many installers to leave this out or to install GFI/GFCI protection instead of GFEP protection as GFEP devices are expensive, but under NEC it is required to prevent accidental tripping as the heat tape adjusts output.
Pre-Installation Checklist
Remove gutter or leaf guards.
Clear the roof and gutters of all debris.
Test the heat tape in an outlet (self regulating systems only) to ensure that it heats up.
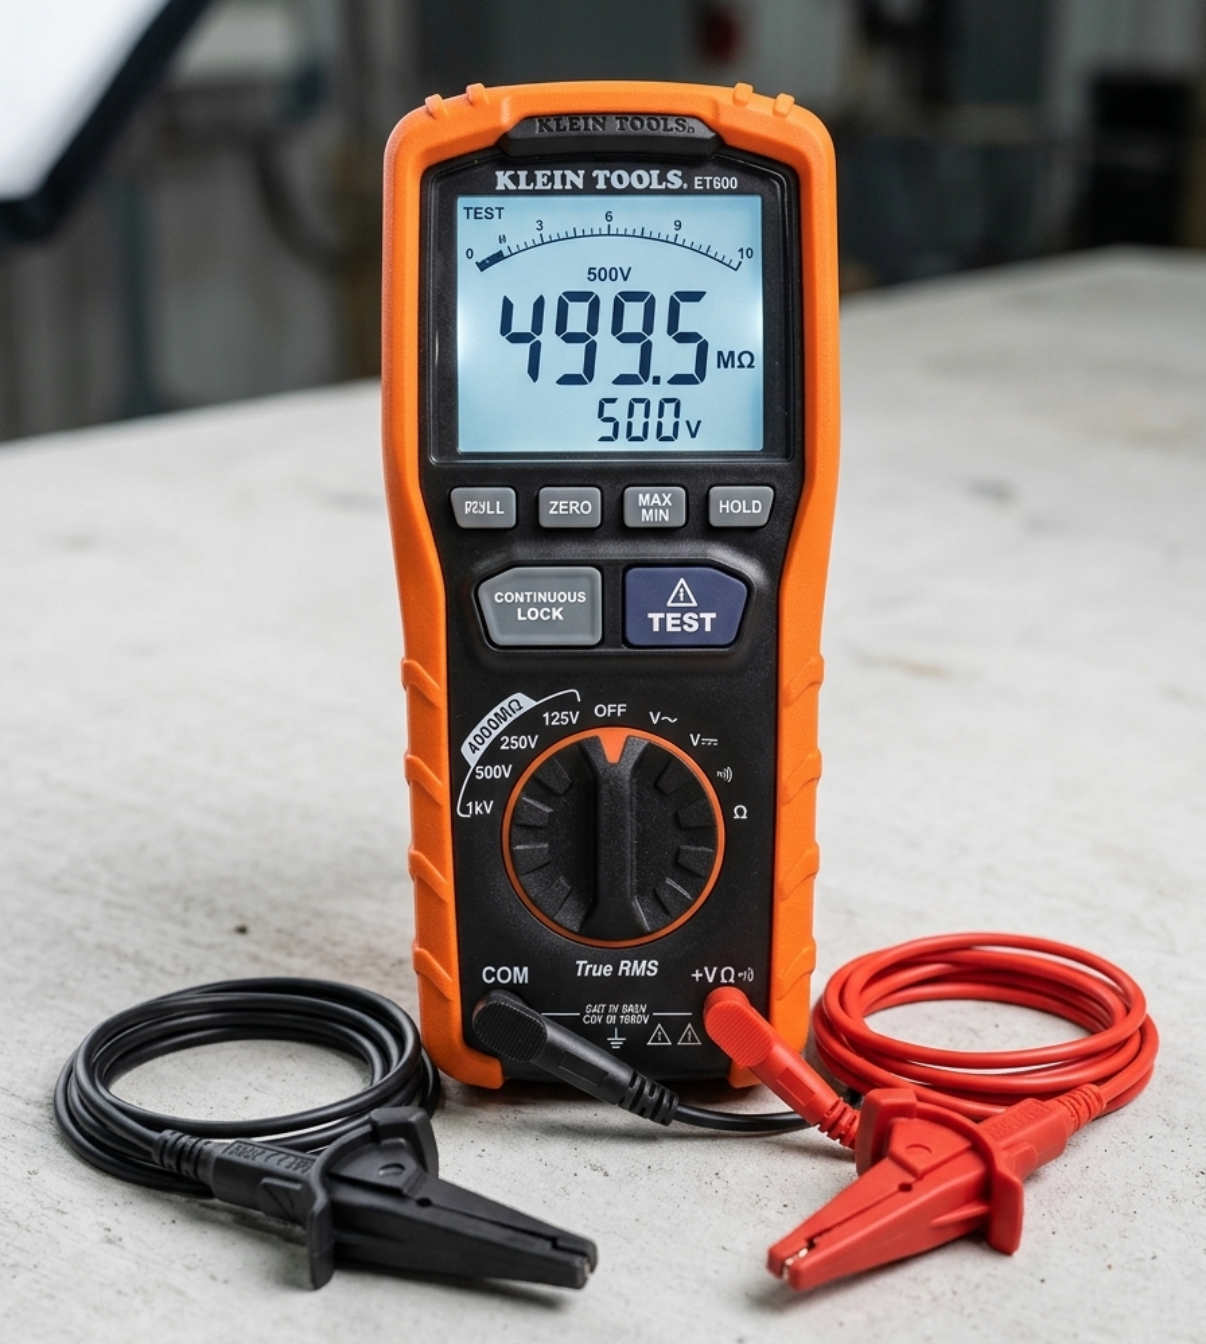
Test the heat tape with a multimeter/ meghometer to conduct an insulation resistance test. Input 1000v, the system should read back with the same voltage and at least 1000MΩ.
Review your plan and ensure you didn't miss anything.

Installation Process
Now that you've got the right stuff aligned with the right power requirements, the last half is with the installation itself.
1. Measure and Mark (for attachments)
2. Attach Clips/ Clamps/ Adhesive (no nails/ staples/ screws
3. Run Gutters/ Downspouts (typically before the roof)
4. Snap/ Clip cable into the clips.
5. Final Test (power/ multimeter)
1. Measure and Mark First (Precision Layout)
Before touching the heat tape, lay out your design using chalk or temporary markers along the roof edge and valleys. A well measured system looks good and functions properly. A spaghetti system looks bad and causes bad water flow (potentially leading to leaking)
Maintain Straight Valleys: Keep at least 1 run entering and exiting roof valleys strictly linear. Curved, zig-zagged, or sagging valley lines don't create clear channels for water to flow. If you've ever had working heat tape and an Ice dam creating leaking at the same time, this is probably why.
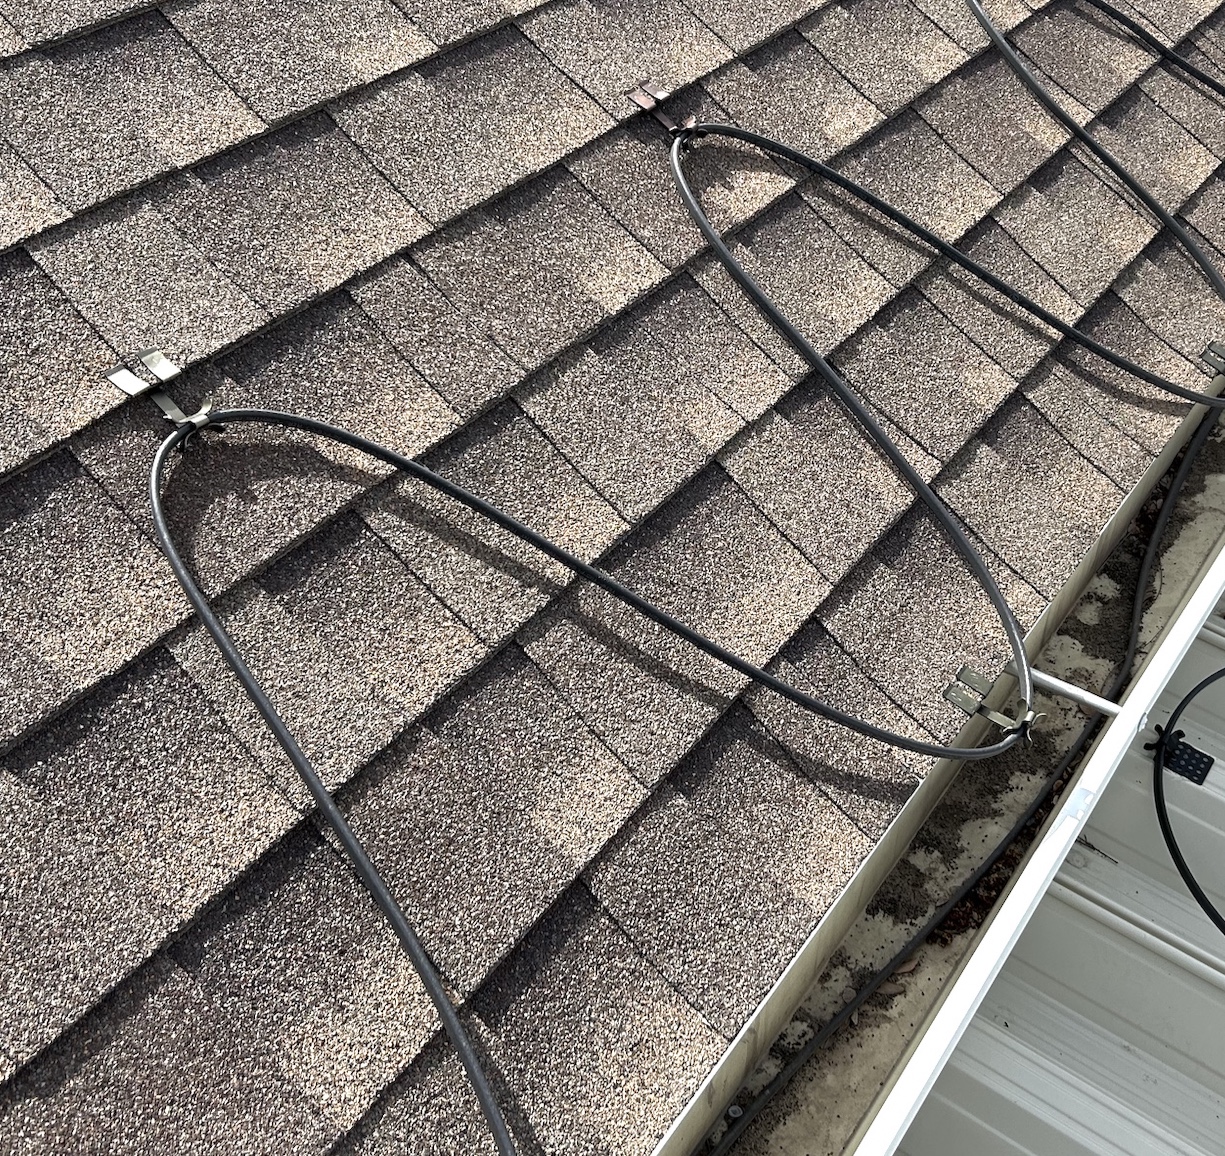
Uniform Serpentine Pattern: Mark the high and low clip points at consistent intervals based on your overhang depth. Uniform patterns allow melt water to flow down designated channels between the loops rather than trapping water behind erratic cable placement.
2. Fasten Roof Clips (Zero Roof Penetrations)
Protecting your roof membrane is non-negotiable. Never use nails, screws, or staples to secure clips to shingles. Penetrating the roof deck creates leak paths that lead to rot and void shingle warranties. Use UV-resistant, heavy-duty roof clips designed to slide under the shingle edge or adhere using commercial-grade, weatherproof adhesives (such as high-grade silicone (SB-90)).Ensure clips are completely set and secured before applying tension with the cable. On metal roofs, use S-5! standing seam clamps or adhesive based clips.
3. Route Gutters & Downspouts First
Always work from the drainage channels up. Run your continuous cable down into the gutters, in drain pipes (french drains), and drop it through the downspout to the discharge point first. Installs vary and sometimes this won't be the first thing to do.
4. Snap Cable into Roof Clips
With the downspout and gutter channels set, clip the remaining cable along your marked roof line.
Keep tension firm, but not tight. Maintain minimum bend radius limits specified by the manufacturer (never kink self-regulating cable). Consider using cable guard, near sharp surfaces or at the end of downspouts if the heat tape extends out. T-spicing systems are common, but they are usually more prone to premature failure. Ensure any splices or end caps are installed out of water ways (ie. avoid installing them in valleys, laying flat in the gutter, or end of downspout without being positioned in the upward direction).
5. Final Electrical & Multimeter Verification
Before declaring the job done, perform a final two-part test: test it with a multimeter again, to see if anything happened to it during installation, power the heat tape to ensure it heats up.


Why a quality installation matters.
Poor or incorrect installations lead to problems
Does it look like a spaghetti mess? Messy installs don't create clear water channels, resulting in water leaking through your roof.
Installations that use screws, staples, or nails, creating unprotected pathways for water to enter into your home.
Fire Hazard: Low quality heat tape like constant wattage heat tape can't be overlapped. Doing so causes it to short out or even catch fire.
Missing key installation points, like gutters, downspouts, or roof valleys. Installing just the roof line won't allow the melt water to flow freely from your roof if you deal with ice dams.
System ends or species left directly in water ways. The #1 reason a self-regulating system will fail is due to poor placement of these connections in gutters or valleys. Water will find a way in and short out the heat tape.
Proper installations live long and are reliable.
Self-Regulating heat tape will last 20-30 years when installed correctly. It is safe to be overlapped, preventing a premature life of the cable.
Installations with high quality clips or clamps will keep your system fastened to your roof even during large wind events. Any re-installed cables should use brand new clips or clamps.
Keep your roof and heat tape warranties valid. Improper installation will cause your roof and heat tape to be warranty void.
Prevents breaker trips: Following National Electrical Codes (NEC) and ensure the amount of heat tape is not over amount of power available will ensure your system will stay on in the coldest temps.
Prevent ice dams and ice build up. Overall, a correctly installed system is going to be able to keep up heavy snow load demand, and actually do its job in keeping those ice dams off your home.
Controlling the System
Even self-regulating cables, which automatically lower their power output in warmer temps, never fully turn themselves off. Left plugged in continuously, a standard 100-foot cable can quietly waste hundreds of dollars in electricity over a single winter or throughout the year.
Depending on your budget and convenience preferences, heat tape systems are controlled in one of four ways:
1. Manual Control (Plug-In / Wall Switch)
Most Common: You manually plug the system into an outlet or flip a dedicated wall switch when snow is forecasted, and flip it off when the roof clears. This is the lowest upfront installation cost. This method does have a high risk of human error. If you forget to turn it on before a blizzard, ice dams form. If you forget to turn it off during a winter warm spell, you’ll burn through electricity unnecessarily.
Nordic Verdict: Best reserved for single or double circuit systems.
2. Thermacord: Ambient Air Thermostats (Temperature-Only)
Budget Friendly: An automatic controller plug-in senses ambient air temperature. It automatically turns the system ON when temperatures drop below freezing (typically 38°F / 3°C) and OFF when it warms up. This eliminates the need to manually flip switches. However, Temperature alone doesn't mean you need heat. If it’s 20°F and bone-dry with no snow on the roof, an ambient thermostat will still power the cables continuously, wasting electricity on dry shingles. This is only available for 120v systems.
Nordic Verdict: A solid baseline upgrade over manual plugs. Most homeowners will either use this option or a dedicated switch to turn on/off the heat tape system.
3. Smart Controls & Moisture-Sensing Systems (The Gold Standard)
Installations prices spike with these systems. Commercial-grade systems combine both temperature and moisture sensors mounted directly in the gutter or on the roof edge. The cable turns on ONLY when temperatures are below freezing AND active snow or ice melt is detected. These can save up to 70% Energy Savings: Never runs on cold, dry days. These can increase the lifespan of the heat tape by reducing overall heating hours on the cable, preventing thermal wear over 20-30 years.
Nordic Verdict: Recommended for large roof systems (800-4000 ft of heat tape) or residential properties where energy efficiency is a priority.
4. Wi-Fi Smart Controllers (App & Remote Smartphone Control)
This is generally the most expensive controller. The controller connects to your home's 2.4GHz Wi-Fi network, giving you complete real-time management via a smartphone app (such as Smart Life, My Leviton, or native smart-home platforms). You can toggle the system remotely, set customized weekly schedules, monitor real-time cable power status, and receive automatic weather alerts. This controller requires a strong, reliable 2.4GHz outdoor Wi-Fi signal near the exterior outlet or breaker panel. If your Wi-Fi drops, the system defaults to its local internal logic or manual mode.
Nordic Verdict: The perfect choice for tech-conscious homeowners, vacation rental owners, or frequent travelers who want total visibility and peace of mind without having to climb into the attic or walk outside in sub-zero weather to flip a switch.


The Annual Fall Pre-Winter Checklist + Long Term Care
Perform this 10-minute check every October before the first snowfall:
Clear Gutter & Roof Debris:
Remove dry leaves, pine needles, and twigs from gutter channels. Packed organic matter traps moisture, insulates heat cable away from ice, and creates fire risks.
Inspect Cable Jacket Integrity:
Scan for visible cracks, cuts, or animal chew marks on exposed cable sections. Never operate a system with damaged outer insulation.
Verify Clip & Cable Tension:
Check that roof clips haven't loosened under summer heat and that cable loops sit flush without drooping or sagging.
Power-On Dry Run:
Turn the system on for 10 to 15 minutes on a cool fall day. Walk the perimeter and physically feel the cable (or use an infrared thermal camera). The heat tape should feel uniformly warm to the touch along its entire length.
Already have a system, but not sure if it's good to go?

Ready to get started? Contact Nordic Solutions for a free quote and professional advice on keeping your roof snow and ice-free all winter long.